
Category: Laptop Repair and Service
Contents of this article
- How to remove the bottom cover
- How to reassemble Macbook air
- Parts location
MacBook Air
Bottom Case
Tools
This procedure requires the following tools:
# ESD wrist strap and mat
# #00 and #000 Phillips screwdrivers (magnetized)
# Black stick (nylon probe 922-5065) or other non-conductive nylon or plastic flat-blade tool
Preliminary Steps
This procedure requires placing the unit upside down on its display housing. Always use a clean, debris-free static mat to avoid scratches and other cosmetic damage to the unit.

Removal Procedure
Caution: Each screw boss leading from the top case to the bottom case is angled at a different pitch; thus, the angle at which you drive or loosen the screws must correspond accordingly.

1. Remove ten Phillips #000 screws, starting from the top center and moving outward in a circular fashion in both directions.
Note: See the screw map in the Views chapter for the exact placement and size of each screw.

2. Use your fingernails to grip the edge of the bottom case in the rear corners near the display hinge, or use a black stick as a wedge to gently pry up the bottom case a few millimeters— enough to grab the edges with your fingers. You may need to pull with slightly more force on the right side to lift the corner near the MagSafe adapter port.
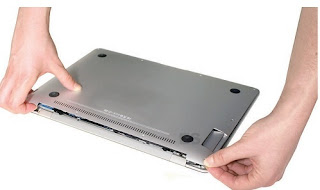
3. Pivot the rear edge upward a few inches to a 30º angle. At that same angle, pull the bottom case outward from the front edge of the top case to preserve the integrity of the front clips.

Reassembly Procedure
1. While holding the bottom case at a 30º angle, insert the clips on its front edge into the tabs on the top case before lowering into place. Make sure no cables are pinched (e.g., the AirPort/Bluetooth antenna assembly on the right side and the microphone cable in the rear).

Caution: Each screw boss leading from the top case to the bottom case is angled at a different pitch; thus, the angle at which you drive or loosen the screws must correspond accordingly. Before actually turning the screw into the boss, make sure the threads are properly aligned. Use the screwdriver to seat the screw at the correct angle, and then turn the screw backward (counterclockwise) until you feel the threads ‘click’ into place. You may need to do this a few times to get the exact thread placement. If you feel resistance, back the screw out and start again. Failure to do so can strip the boss and render the entire top case unusable.

2. Insert ten #000 Phillips screws in the following order, paying close attention to the angle. If a particular screw does not seem to mate easily with its screw boss, set that screw aside and try another of the same size. It should take little effort to screw it in.

Quick Test
Before restarting the system to verify the repair, check for structural and cosmetic integrity by performing the following tests:
• Hold the unit firmly in both hands and gently rock it back and forth; then carefully turn the unit over, listening for any loose components or connectors.
• Place the unit on a clean, flat surface and check for wobble.

Major modules in the MacBook Air

A – Battery
B – Speaker
C – AirPort/ Bluetooth card
D – Port hatch
E –Hard drive
F – Thermal module
G – MagSafe port
H – Flex bracket
I – Logic board
J – Display (hinge)