Replacing the lamp
•
To reduce the risk of electrical shock, always turn the projector off and
disconnect the power cord before
changing
the lamp.
•
To reduce the risk of severe burns, allow the projector to cool for at least 45
minutes before replacing the
lamp.
•
To reduce the risk of injuries to fingers and damageto internal components, use
caution when removing
lamp
glass that has shattered into sharp pieces.
•
To reduce the risk of injuries to fingers and/or compromising image quality by
touching the lens, do not
touch
the empty lamp compartment when the lamp is removed.
•
This lamp contains mercury. Consult your local hazardous waste regulations to
dispose of this lamp in a
proper
manner.
•
To assure optimal performance from the projector,it is recommended that you
purchase a qualified
projector
lamp for lamp replacement.
•
If lamp replacement is performed while the projector is suspended upside-down
from the ceiling, make
sure
that no one is underneath the lamp socket to avoid any possible injury or
damage to the human eyes
caused
by fractured lamp.
1.
Turn the power off and disconnect the projector from the power outlet. If the
lamp is
hot, avoid burns by waiting for approximately 45 minutes until the lamp has cooled.
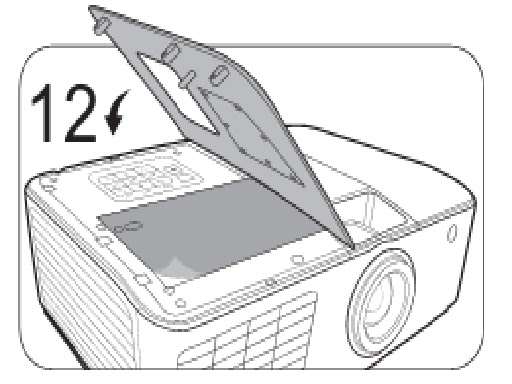
2.
Loosen the screw(s) that secures the lamp cover on
the side of the projector until the lamp cover
loosens
Remove the lamp cover from the projector.
* Do not turn the power on with the lamp cover removed.
* Do not insert your fingers between the lamp and the projector.
The
sharp edges inside the projector may cause injuries.
Disconnect the lamp connector from the projector
as illustrated.
Loosen the screw that secures the lamp.
Lift the handle so that it stands up
Use the handle to slowly pull the lamp out of the projector.
•
Pulling it too quickly may cause the lamp to break and scatter broken
glass in the projector.
•
Do not place the lamp in locations where water might splash on it, children
can reach it, or near flammable materials.
•
Do not insert your hands into the projector after the lamp is removed.
If you touch the optical components inside, it could cause color
unevenness and distortion of the projected images.
As shown in the figure, lower the new lamp
Tighten the screw that secures the lamp.
Ensure the handle is fully laid flat and locked in place.
Reconnect the lamp connector.
•
Loose screw may cause a bad connection, which could result in malfunction.
•
Do not over tighten the screw
Replace the lamp cover on the projector.
Tighten the screw(s) that secures the lamp cover.
•
Loose screw may cause a bad connection, which could result in malfunction.
•
Do not over tighten the screw.
Connect the power and restart the projector. Do
not turn the power on with the lamp cover removed.
Resetting the lamp
timer
15.
After the start up logo, open the On-Screen Display (OSD) menu. Go to the SYSTEM
SETUP: Advanced> Lamp Settings menu. Press MODE/ENTER. The
Lamp Settings page displays. Highlight Reset Lamp Timer. A warning message
is displayed asking if you want to reset the lamp timer. Highlight Reset and press
MODE/ENTER. The lamp time will be reset to “0”. Do
not reset if the lamp is not new or replaced as this could cause damage.